Friday, October 2, 2015

Get Oracle Version details

In this small post, I am sharing the commands to get details about the oracle version you are using. Although much detail is there in Oracle documentation, but thought of sharing this small tips :).

Steps:

Connect to Oracle DB using CLI or UI tool as you wish. Here I am connecting with Oracel SQL Developer. There are number of ways for getting the details. I sharing below ones.

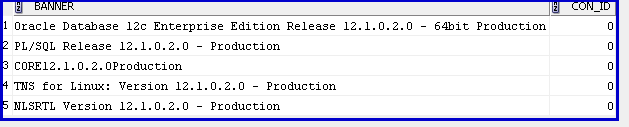
  1. select * from v$version;


  1.    2. select version from v$instance;

  2.             3. select * from product_component_version;*

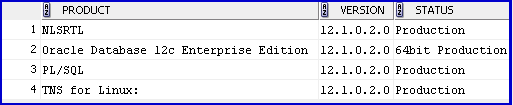
  3. Regarding the release number format, there is very good explanation on Oracle Doc site. Please go through it for details.
  4. Thanks!!

Thursday, October 1, 2015

boot2docker Error

I have installed boot2docker and when I tried to play with docker, I have started getting below error for every docker commands that I run.

Error

FATA[0000] Get http:///var/run/docker.sock/v1.18/version: dial unix /var/run/docker.sock: An address incompatible with the requested protocol was used.. Are you trying to connect to a TLS-enabled daemon without TLS?


I have checked about the vm status and everything seems good, as below:


After some troubleshooting, I found that issue was with some system variables. Basically there are three variables, which you need to set to make this working. In windows you can use set command and in Linux you can use export command:

   set DOCKER_HOST=tcp://192.168.59.103:2376    
   set DOCKER_CERT_PATH=C:\Users\kuldeep.d.sharma\.boot2docker\certs\boot2docker-vm   
   set DOCKER_TLS_VERIFY=1

Note: When you initialize your boot2docker, it will provide you all details and ask to update variables. 
P.S.- Change above values accordingly :).

Below is the screen shot, where I tried to set each variable and saw the different result and dependencies of these variables on each other.


Thanks!!

Tuesday, August 4, 2015

Installing Jboss A-MQ 6.2

Jboss A-MQ 6.2 has been released on 2015-06-23 with lots of bug fixes along with major switch from Active MQ 5.9 to 5.11. Below are the steps for installing the new version and exploring the messaging world :) .


1.) Download JBoss A-MQ 6.2.0.GA Zip and md5 checksum to ensure the integrity.

2.) Compare the md5 checksum of zip file with downloaded one.

3.) If, both are same then unpack the archive. If you are unpacking the archive in windows, then make sure that you don't have any space and any special characters in name as %, $, # etc.

4.) Configure Users and Roles as per your requirements to $AMQ_HOME/etc/users.properties . Format will be as below.
# USER=PASSWORD,ROLE1,ROLE2,…

Note: I am using here simple admin password for demo, but in Live scenarios please choose strong password, as this password will be stored in plain text.  Jboss A-MQ 6.2 support RBAC(Role Based Access control), So we can assign different roles as per needed.

5.) Start AMQ instance.

6.) Login to console to view runtime information about container.

7.) Verify the Installations :
a.) Send message using below command, by default it will send 1000 messages to TEST queue.
#./bin/client "activemq:producer --user Username --password Password"
b.)  Check status about the messages:
#./bin/client "activemq:dstat"
c.) Run consumer client to consume the messages from TEST Queue as below :
#./bin/client "activemq:consumer --user Username --password Password"
d.) Again verify the Queue status by running following command:
#./bin/client "activemq:dstat"

You can explore all these information and even much more using hawtio console. It provide really impressive pictorial view for digging further and monitor the things using JMX mbeans.

Below are few screen shot from hawtio console:
ActiveMQ Tab :

Dashboard Tab:

JMX Tab:


Friday, July 31, 2015

Chef Server Overview

Currently we are leaving in digital world and IT Infrastructure is increasing day by day. In such situation it becomes difficult to manage number of servers, especially when we need to install or configure same thing on multiple systems.

                         
    So, chef is going to make your task easy to manage whole infrastructure without much effort. Chef is used as automation framework with which we can install/deploy servers and applications to any VM, cloud and physical servers. 

There were terms which we are going to use more often as we proceed:

  1. chef-client  :  This is the tool which is being installed on all the system managed by chef. It'll perform all task specified by runlist and also fetch any updated contents if any from chef-server.
  2. Workstation : Workstation are the nodes/system configure to author changes and push them to server. We can also bootstrap new nodes and apply changes to those from workstation.
  3. chef-server : The main server(hub/store) :), used to centralize and store all information at one place. Everything i.e. cookbooks, roles and policy setting will be uploaded to chef server from workstation. We also have user friendly Chef management console from where we can manage data bags, attributes, runlists, roles etc.
  4. Nodes : Node is any system where we have to install or configure anything. A node may be physical, virtual or cloud system. These are being configured by chef-client, so we should have chef-client installed on each node need to be managed by chef-server.
  5. Cookbooks : A cookbook is the mail part of whole configuration. It defines the scenarios and contains all information and configuration that needed to support that scenario:
    1. Recipes: which specifies the things(resources)  we can use and execution steps for those resources.
    2. Attribute: special values which can be referred in recipes.
    3. Files : Some static files/data which is needed as it is.
    4. Template: to store dynamic or common data with some changes.
  6. knife : knife is the mail tool used for interaction between local repo on workstation and the chef-server. We push data to chef-server using knife, then it can be used by different number of nodes managed by chef-server. Below are things knife help us to manage:
    1. Nodes
    2. Cookbooks and Recipes
    3. Roles
    4. Envrionments
    5. Data bags 
  7. Bookshelf: This component of chef server is used to store and manage cookbook data - templates, files with version. All cookbook contents will be stored by doing checksum of contents. So, if two different version of cookbook or different cookbook have same file or template, then bookshelf will store that file/template only once.
  8. Message Queues : Search Index fetch messages with the help of below components:
    1. RabbitMQ : used as messaging server for chef-server. All item in search indexes are first added the queue on RabbitMQ messaging server.
    2. chef-expander: used for fetching messages from RabbitMQ queue, then process to required format and forward them to chef-solr for indexing.
    3. chef-solr: contains Apache-solr and then expose its REST api for doing indexing and search.
  9. Nginx : Open Source HTTP Web and Reverse Proxy Server used as front-end load balancer. Nginx serve all requests coming to chef-server.
  10. PostgreSQL : used for storing all repository data for chef-server.


In next article, we will try to create setup with chef server, one node and one workstation.


Wednesday, February 25, 2015

Reset root Password in Centos 7/Fedora Server 21

Its mandatory to setup password for root account in Linux. Sometimes, we don't remember passowrd and somehow lose. There are the procedures for breaking it or you can say reset this to new one.

Below is the step by step process for achieving the target  :
  • Boot up your Fedora system, during bootsplash/bootscreen press arrow keys which will show you grub boot screen as below:
  • Press "e" to enter into edit mode as below:
  • After this scroll down to line starting with "linux16" and add "rw init=/bin/bash" at the end of line. Now what these parameter do is :
      1. rw : With this option kernel will mount the root File System in Read-Write mode.
      2. init=/bin/bash : In Linux/Unix based systems init is the first process which gets started during booting. Here we are asking to start bash shell instead of normal system initialization scripts.

  • Now boot System using "Ctrl-x" as mentioned in screen as well and it will take you to bash shell with root file system mounted in read-write mode.


  • After that verify the mounted root file system, reset your root password.
root file system mounted without "rw" option
root File System mounted with "rw" option
  • Create .autorelabel file in root(/) file system to relabel SeLinux Policy as changing password will change the other files as well e.g. shadow. Another thing you need to reboot server forcefully otherwise it will not be able to communicate with init daemon for reboot. SO, make sure to use "-f" switch during reboot. If reboot doesn't work, then try with "exec /sbin/init" command.  Finally reboot the server and test your new password.

  • Login to System and check when your password have been changed :).

Enjoy!!

Integrate Jenkins with Azure Key Vault

Jenkins has been one of the most used CI/CD tools. For every tool which we are using in our daily life, it becomes really challenges when ...