Friday, August 22, 2014

make: o: Command not found in Sysstat

Today, I was trying to update my sysstat package to latest version i.e. 11.0. I have downloaded and start compiling the package. Now, during compilation process, when I fire make command, I got some errors like "make: o: Command not found".
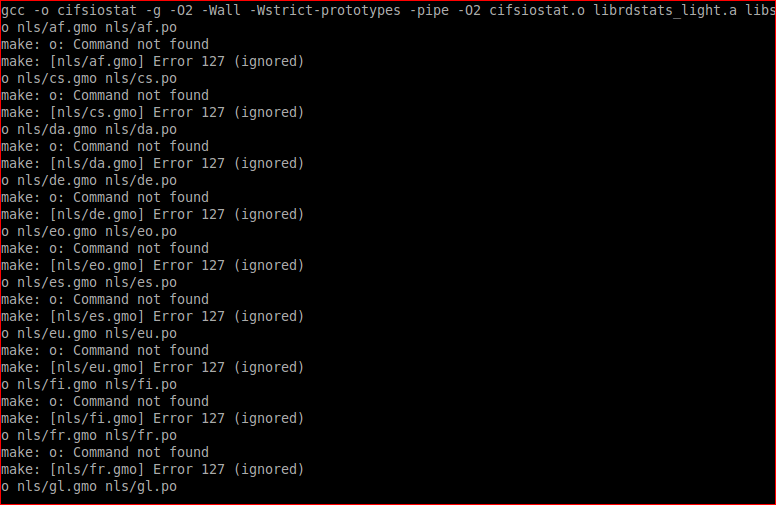
Errors :

gcc -o cifsiostat -g -O2 -Wall -Wstrict-prototypes -pipe -O2 cifsiostat.o librdstats_light.a libsyscom.a -s
o nls/af.gmo nls/af.po
make: o: Command not found
make: [nls/af.gmo] Error 127 (ignored)
o nls/cs.gmo nls/cs.po
make: o: Command not found
make: [nls/cs.gmo] Error 127 (ignored)
o nls/da.gmo nls/da.po
make: o: Command not found
make: [nls/da.gmo] Error 127 (ignored)
o nls/de.gmo nls/de.po
make: o: Command not found
make: [nls/de.gmo] Error 127 (ignored)
o nls/eo.gmo nls/eo.po
make: o: Command not found
make: [nls/eo.gmo] Error 127 (ignored)
o nls/es.gmo nls/es.po
make: o: Command not found
make: [nls/es.gmo] Error 127 (ignored)
o nls/eu.gmo nls/eu.po
make: o: Command not found
make: [nls/eu.gmo] Error 127 (ignored)
o nls/fi.gmo nls/fi.po
make: o: Command not found
make: [nls/fi.gmo] Error 127 (ignored)
o nls/fr.gmo nls/fr.po
make: o: Command not found
make: [nls/fr.gmo] Error 127 (ignored)
o nls/gl.gmo nls/gl.po
make: o: Command not found
make: [nls/gl.gmo] Error 127 (ignored)
o nls/hr.gmo nls/hr.po
make: o: Command not found
From error it seems issue with nls(National Language Support). So, to remove this error we need to disable this during compilation. We can do this by passing "--disable-nls" option with configure. If you are not sure about the exact option, you can get it from "./configure --help | grep -i nls".

root@lubuntu1:/data/Softies/sysstat-11.0.0# ./configure --help | grep nls  --disable-nls           disable National Language Supportroot@lubuntu1:/data/Softies/sysstat-11.0.0# 
After, this compile the updated version and have fun with different monitoring utilities.

root@lubuntu1:/data/Softies/sysstat-11.0.0# ./configure --disable-nlsroot@lubuntu1:/data/Softies/sysstat-11.0.0# make && make install

Thanks!!

Wednesday, June 4, 2014

Check Important information like Product-name, Version, codename etc in Jboss EAP 6 or Wildfly 8 using CLI.

Sometimes, we need some information about the product we are using. Suppose, we want to know about the product version, name, codename or running mode in Jboss AS 7, Jboss EAP 6 or Wildfly-8.[0-1]. We can do all this easily using built in CLI utility.


Below are the steps :
1.) Start your Application Server Instance in any mode(standalone/domain). Here, we are doing all this in standalone mode.

root@lubuntu1:/data/wildfly-8.1.0.Final/bin# ./standalone.sh
=========================================================================

  JBoss Bootstrap Environment

  JBOSS_HOME: /data/wildfly-8.1.0.Final

  JAVA: java

  JAVA_OPTS:  -server -Xms64m -Xmx512m -XX:MaxPermSize=256m -Djava.net.preferIPv4Stack=true -Djboss.modules.system.pkgs=org.jboss.byteman -Djava.awt.headless=true

=========================================================================

12:32:02,587 INFO  [org.jboss.modules] (main) JBoss Modules version 1.3.3.Final
12:32:06,242 INFO  [org.jboss.msc] (main) JBoss MSC version 1.2.2.Final
12:32:07,582 INFO  [org.jboss.as] (MSC service thread 1-2) JBAS015899: WildFly 8.1.0.Final "Kenny" starting
12:32:20,281 INFO  [org.jboss.as.server] (Controller Boot Thread) JBAS015888: Creating http management service using socket-binding (management-http)
12:32:20,494 INFO  [org.xnio] (MSC service thread 1-2) XNIO version 3.2.2.Final
   2.) Create a new Management user using add-user.sh|bat
root@lubuntu1:/data/wildfly-8.1.0.Final/bin# ./add-user.sh

What type of user do you wish to add?
 a) Management User (mgmt-users.properties)
 b) Application User (application-users.properties)
(a):

Enter the details of the new user to add.
Using realm 'ManagementRealm' as discovered from the existing property files.
Username : admin
User 'admin' already exists and is disabled, would you like to...
 a) Update the existing user password and roles
 b) Enable the existing user
 c) Type a new username
(a):
Password recommendations are listed below. To modify these restrictions edit the add-user.properties configuration file.
 - The password should not be one of the following restricted values {root, admin, administrator}
 - The password should contain at least 8 characters, 1 alphabetic character(s), 1 digit(s), 1 non-alphanumeric symbol(s)
 - The password should be different from the username
Password :
Re-enter Password :

 3.) Connect to controller using ./jboss-cli.sh|bat script present in $JBOSS_HOME/bin directory.
lubuntu@lubuntu1:/data/wildfly-8.1.0.Final/bin$ ./jboss-cli.sh -c --controller=127.0.0.1:9990
Authenticating against security realm: ManagementRealm
Username: admin
Password:
[standalone@127.0.0.1:9990 /]

4.) Check all required Information :
     a.) Using 'ls -l'  command.
[standalone@127.0.0.1:9990 /] ls -l
ATTRIBUTE                VALUE       TYPE  
launch-type              STANDALONE  STRING
management-major-version 2           INT   
management-micro-version 0           INT   
management-minor-version 1           INT   
name                     lubuntu1    STRING
namespaces               []          OBJECT
process-type             Server      STRING
product-name             undefined   STRING
product-version          undefined   STRING
profile-name             undefined   STRING
release-codename         Kenny       STRING
release-version          8.1.0.Final STRING
running-mode             NORMAL      STRING
schema-locations         []          OBJECT
server-state             running     STRING

CHILD                MIN-OCCURS MAX-OCCURS
core-service         n/a        n/a       
deployment           n/a        n/a       
deployment-overlay   n/a        n/a       
extension            n/a        n/a       
interface            n/a        n/a       
path                 n/a        n/a       
socket-binding-group n/a        n/a       
subsystem            n/a        n/a       
system-property      n/a        n/a

In EAP 6.*
[standalone@127.0.0.1:9999 /] ls -l
ATTRIBUTE                VALUE                 TYPE  
launch-type              STANDALONE            STRING
management-major-version 1                     INT   
management-micro-version 0                     INT   
management-minor-version 5                     INT   
name                     lubuntu1              STRING
namespaces               []                    OBJECT
process-type             Server                STRING
product-name             EAP                   STRING
product-version          6.2.0.GA              STRING
profile-name             undefined             STRING
release-codename         Janus                 STRING
release-version          7.3.0.Final-redhat-14 STRING
running-mode             NORMAL                STRING
schema-locations         []                    OBJECT
server-state             running               STRING 
     b.) Using read-attribute :

[standalone@127.0.0.1:9999 /] read-attribute --name=product-version
6.2.0.GA
[standalone@127.0.0.1:9999 /] read-attribute --name=product-name
EAP
[standalone@127.0.0.1:9999 /] read-attribute --name=launch-type
STANDALONE
[standalone@127.0.0.1:9999 /] read-attribute --name=release-codename
Janus
[standalone@127.0.0.1:9999 /] read-attribute --name=release-version
7.3.0.Final-redhat-14
[standalone@127.0.0.1:9999 /] read-attribute --name=running-mode
NORMAL
[standalone@127.0.0.1:9999 /] read-attribute --name=name
lubuntu1

[standalone@127.0.0.1:9999 /] :read-attribute(name=product-version)
{
    "outcome" => "success",
    "result" => "6.2.0.GA"
}
[standalone@127.0.0.1:9999 /] :read-attribute(name=product-name)
{
    "outcome" => "success",
    "result" => "EAP"
}
[standalone@127.0.0.1:9999 /] :read-attribute(name=release-codename)
{
    "outcome" => "success",
    "result" => "Janus"
}
[standalone@127.0.0.1:9999 /] :read-attribute(name=release-version)
{
    "outcome" => "success",
    "result" => "7.3.0.Final-redhat-14"
}
[standalone@127.0.0.1:9999 /] 

Happy Learning :) !!

Wednesday, May 28, 2014

Install monitoring Utilities like "sar" and "iostat" in Debian Based Distros

Today, I was looking for "sar" (Report System and CPU performance) and "iostat" (Report Disk and IO Performance) on Debian Based Distro i.e. lubuntu.
But didn't find the command, infact it gives me hint that which package contain this command.


root@lubuntu1:~# iostat
The program 'iostat' is currently not installed. You can install it by typing:
apt-get install sysstat
root@lubuntu1:~#

Another, option if you want to know about that which package may contain specific command, just make use of "apt-cache". Just run below command to find out the related packages. Here, I am looking for "iostat".

root@lubuntu1:~# apt-cache search iostat
sysstat - system performance tools for Linux
dstat - versatile resource statistics tool
ganglia-modules-linux - Ganglia extra modules for Linux (IO, filesystems, multicpu)
ifstat - InterFace STATistics Monitoring
nicstat - print network traffic statistics
pcp-import-iostat2pcp - Tool for importing data from iostat into PCP archive logs
r-cran-epi - GNU R epidemiological analysis
r-cran-epibasix - GNU R Elementary Epidemiological Functions
r-cran-rms - GNU R regression modeling strategies by Frank Harrell
root@lubuntu1:~#
Now, we can see that sysstat contains all system performance tools. Let us check further what actually it contains for system monitoring.

root@lubuntu1:~# apt-cache show sysstat
Package: sysstat
Priority: optional
Section: admin
Installed-Size: 848
Maintainer: Ubuntu Developers <ubuntu-devel-discuss@lists.ubuntu.com>
Original-Maintainer: Robert Luberda <robert@debian.org>
Architecture: i386
Version: 10.2.0-1
Depends: bzip2, lsb-base (>= 3.0-6), ucf (>= 2.003), debconf (>= 0.5) | debconf-2.0, libc6 (>= 2.7), libsensors4 (>= 1:3.0.0)
Recommends: cron
Suggests: isag
Filename: pool/main/s/sysstat/sysstat_10.2.0-1_i386.deb
Size: 271332
MD5sum: a7057ea16e428c8d9b6a6fc8fd6a3a46
SHA1: b769779a1397b25a121a3a8c47892289a82f1320
SHA256: 0e6bba036c211aa7aa5d8ae89ae7f0fa9a134f60d458ce8da390a8163889b0b1
Description-en: system performance tools for Linux
 The sysstat package contains the following system performance tools:
  - sar: collects and reports system activity information;
  - iostat: reports CPU utilization and disk I/O statistics;
  - mpstat: reports global and per-processor statistics;
  - pidstat: reports statistics for Linux tasks (processes);
  - sadf: displays data collected by sar in various formats;
  - nfsiostat: reports I/O statistics for network filesystems;
  - cifsiostat: reports I/O statistics for CIFS filesystems.

 .
 The statistics reported by sar deal with I/O transfer rates,
 paging activity, process-related activities, interrupts,
 network activity, memory and swap space utilization, CPU
 utilization, kernel activities and TTY statistics, among
 others. Both UP and SMP machines are fully supported.
Description-md5: 53969a0c693353fe5d132e483e9ab770
Homepage: http://pagesperso-orange.fr/sebastien.godard/
Bugs: https://bugs.launchpad.net/ubuntu/+filebug
Origin: Ubuntu
Supported: 5y

So, after installing sysstat, we'll be able to run all highlighted commands like iostat, mpstat, sar etc.

So, Finally Install the package using apt-get.

root@lubuntu1:~# apt-get install sysstat
Reading package lists... Done
Building dependency tree      
Reading state information... Done
Suggested packages:
  isag
The following NEW packages will be installed:
  sysstat
0 upgraded, 1 newly installed, 0 to remove and 128 not upgraded.
Need to get 271 kB of archives.
After this operation, 868 kB of additional disk space will be used.
Get:1 http://us.archive.ubuntu.com/ubuntu/ trusty/main sysstat i386 10.2.0-1 [271 kB]
Fetched 271 kB in 8s (30.2 kB/s) 
Preconfiguring packages ...
Selecting previously unselected package sysstat.
(Reading database ... 139942 files and directories currently installed.)
Preparing to unpack .../sysstat_10.2.0-1_i386.deb ...
Unpacking sysstat (10.2.0-1) ...
Processing triggers for man-db (2.6.7.1-1) ...
Processing triggers for ureadahead (0.100.0-16) ...
Setting up sysstat (10.2.0-1) ...

Creating config file /etc/default/sysstat with new version
update-alternatives: using /usr/bin/sar.sysstat to provide /usr/bin/sar (sar) in auto mode
Processing triggers for ureadahead (0.100.0-16) ...
Now, your system have some good commands that you can use for monitoring. Below are few basic example. I'll cover each in separate post with details.

root@lubuntu1:~# iostat
Linux 3.13.0-24-generic (lubuntu1.com)     05/28/2014     _i686_    (1 CPU)

avg-cpu:  %user   %nice %system %iowait  %steal   %idle
          24.73    0.03   74.29    0.19    0.00    0.77

Device:            tps    kB_read/s    kB_wrtn/s    kB_read    kB_wrtn
sda               7.33        97.11        59.68    1809233    1111804
dm-0              0.01         0.04         0.00        768          0
dm-1              9.04        96.38        59.55    1795609    1109536
dm-2              0.15         0.56         0.12      10377       2172


For checking CPU statistics only for every two 2 seconds use "-c 2" option as below:

root@lubuntu1:~# iostat -c   2
Linux 3.13.0-24-generic (lubuntu1.com)     05/28/2014     _i686_    (1 CPU)

avg-cpu:  %user   %nice %system %iowait  %steal   %idle
          24.73    0.03   74.29    0.19    0.00    0.77

avg-cpu:  %user   %nice %system %iowait  %steal   %idle
          21.39    0.00   78.61    0.00    0.00    0.00
root@lubuntu1:~# mpstat
Linux 3.13.0-24-generic (lubuntu1.com)     05/28/2014     _i686_    (1 CPU)

09:56:25 AM  CPU    %usr   %nice    %sys %iowait    %irq   %soft  %steal  %guest  %gnice   %idle
09:56:25 AM  all   24.75    0.03   74.15    0.19    0.00    0.13    0.00    0.00    0.00    0.76
root@lubuntu1:~# mpstat -P ALL
Linux 3.13.0-24-generic (lubuntu1.com)     05/28/2014     _i686_    (1 CPU)

09:56:31 AM  CPU    %usr   %nice    %sys %iowait    %irq   %soft  %steal  %guest  %gnice   %idle
09:56:31 AM  all   24.75    0.03   74.15    0.19    0.00    0.13    0.00    0.00    0.00    0.76
09:56:31 AM    0   24.75    0.03   74.15    0.19    0.00    0.13    0.00    0.00    0.00    0.76

 Thanks!!

Monday, May 26, 2014

How to take JVM Heap Dump using jmap

We have different options for taking a heap dump of running JAVA process and then analyze those dump for any kind for memory leak.
Today, We are going to do the same using "jmap" in-built utility provided with JDK. Using this you will get an advantage that you don't need to wait untill our JVM got crashed by using passing "-XX:+HeapDumpOnOutOfMemoryError" parameter to JVM process.

We can capture current status using jmap as below:
1.) Find out the jmap location(only if your JAVA_HOME variable not defined)
      #locate jmap
2.) After finding jmap location, move to that directory and run jmap to get live thread dump.
      #./jmap -dump:live,format=b,file=[file location] [pid]


For more details and options run the command with help option as below :

# ./jmap -help
Usage:
    jmap [option] <pid>
        (to connect to running process)
    jmap [option] <executable <core>
        (to connect to a core file)
    jmap [option] [server_id@]<remote server IP or hostname>
        (to connect to remote debug server)

where <option> is one of:
    <none>               to print same info as Solaris pmap
    -heap                to print java heap summary
    -histo[:live]        to print histogram of java object heap; if the "live"
                         suboption is specified, only count live objects
    -permstat            to print permanent generation statistics
    -finalizerinfo       to print information on objects awaiting finalization
    -dump:<dump-options> to dump java heap in hprof binary format
                         dump-options:
                           live         dump only live objects; if not specified,
                                        all objects in the heap are dumped.
                           format=b     binary format
                           file=<file>  dump heap to <file>
                         Example: jmap -dump:live,format=b,file=heap.bin <pid>
    -F                   force. Use with -dump:<dump-options> <pid> or -histo
                         to force a heap dump or histogram when <pid> does not
                         respond. The "live" suboption is not supported
                         in this mode.
    -h | -help           to print this help message
    -J<flag>             to pass <flag> directly to the runtime system

Common Error that you can get is "[pid]: well-known file is not secure".
The error comes, when you run jmap with user other than with which Java process is running. To overcome this switch to the user with which java process is running and make sure that user has sufficient permission on the directory where you are going create heap dump file, otherwise you may get permission denied errors.


# ./jmap -dump:live,format=b,file=/[Path]/test.hprof 27114
27114: well-known file is not secure

Note: You can list running Java processes using jps(another in-built tool provided with JDK) somewhat similar to "ps" command.
e.g.
$ ./jps | grep -vi jps

Hope this will help you :) !!

Wednesday, May 7, 2014

View Information about installed packages in Debian Based Dostro(Ubuntu/Lubuntu).

Some times we come to situations where we want to get information e.g. check if package is installed or not, if installed then all information related to that one.


Today, we are going to discuss the same on Lubuntu 14.04.There can be number of ways as in linux we have flexibility use number of commands and combined one to get desired results. Here, we will discuss about two most common methods i.e.

1.) Using dpkg to get list of all installed packages.

2.) View all information about installed package.


1.) Using dpkg to get list of all installed packages.

               dpkg(Debian Package Management System) is a package manager for all debian based systems. It is used to install, remove and list all the information about .deb packages. Mostly, dpkg package gets installed by default during installation time.

      a.) View All installed Software using dpkg -l:

                 In Below example I have used head to get just first few lines of output. Use without "head" option to get full list.
Fig-1 Using -l option
               Removing, first few unwanted lines using "sed".

Fig-2

              You can also save output to a file for later as below:

Fig-3
         
             Get Details with Name-Version-Arch together:
Fig-4

           Get total count of installed packages:

Fig-5

      b.) View All installed Software using dpkg --get-selections:

                  Another option we have available with dpkg is "--get-selections"(without quotes).
Fig-6
                 Get count using "wc" and you can compare this with last one :).
Fig-7


2.) View all information about installed package.

          Once, we get the list of installed packages, then we would really like to know more about particular package. So, we have different options available for the same. I am going share the tricks that I know :).
        

             a.) Using aptitude show "package" :

Fig-8

            b.) Using apt-cache show "package" :

Fig-9
Along with all above information, here I also want to share one more tip that can be more helpful. Sometime, you have a package installed and you don't know about the list of files created by that package. In that case "dpkg-query" can be tricky.

Suppose I have lighttpd installed and I want to get the list of all the files associated with this. Use below command as below :

Fig-10

Note: It will work on all debian based distros.

Monday, April 21, 2014

Ubuntu 14.04 Installation


Ubuntu 14.04 (Trusty Tahr) Released – Download Links and Installation Guide
                                
So, Finally Ubuntu has launched its veriosn 14.04 code named “Trust Tahr” with Long Term Support.
Ubuntu release its LTS version within every two years and get 5 years support. With its LTS release it get wider apoption from business side as compared to its less stable Server and Desktop releases which got released every six months.

Ubuntu 14.04 Features

There are some noticeable changes which are highlighted below.
  • Kernel 3.13.x stable version which have lots of updates in many technologies supports more devices, better power management and performance. For all changes have a look on Linux 3.13
  • GNOME Version: 3.10.4-0ubuntu5 based on Unity
  • Firefox 28 default web browser
  • LibreOffice 4.2.3.3 for office suite
  • Thunderbird 24.4 for E-mail client
  • Rhythmbox 3.0.2 default music player.
  • Option for changing Application Menu
  • Good improvement in high-resolution display.
  • Windows have Anti-aliased corner.
  • Have new Language Status menu on top menu bar.
  • For Guest Session, you will get “Temporary Guest Session” warning message


Download Ubuntu 14.04 ISO images

Use following download links to get the latest Ubuntu 14.04.
Here, we’ll follow simple steps to install newly released Ubuntu 14.04 Trusty Tahr” Desktop version.

Installation of Ubuntu 14.04 Desktop

1.) Boot your system with Ubuntu 14.04 Installation Live CD/DVD or ISO.

2. You may visit selecting ‘Try Ubuntu‘ else Select ‘Install Ubuntu‘ to install on computer.


3. Prepare to install Ubuntu. You can select mentioned both the options if you have internet connectivity in your system. (Keep system up to date during installation.)


4. Next is your Installation type. You can select any option as per your requirements and convenience We are selecting here  ‘Erase disk and install Ubuntu‘ as we don’t have other Operating system installed. You can select “Use LVM with the new Ubuntu installation” this will setup Logical Volume Management. Choose Installation type “Something Else” to create partitions manually. Please note these options are for advanced users.


5. Find out your location.


6. Next, Choose your Keyboard layout.


7. Fill up all information required for creating user login credentials


8. All done its time sit back and have some coffee as Installation is going to take some time J. Ubuntu 14.04 Trusty Tahr installation started….


9. Few more screen shot with useful information during installation time .


11. Login screen.


12. Ubuntu 14.04 Trusty Tahr. Install, and Enjoy exploring new nothing with Ubuntu 14.04 LTS J.


Integrate Jenkins with Azure Key Vault

Jenkins has been one of the most used CI/CD tools. For every tool which we are using in our daily life, it becomes really challenges when ...